Secure Your Kubernetes Web Application Using Gatekeeper And Keycloak
In today's connected world, the importance of safeguarding even the simplest of web applications cannot be overstated. In this guide, we present an efficient way to incorporate an essential layer of security—authentication—into your applications, all without altering their foundational code.
This blog post is focused on empowering developers to add an effective shield to their applications. It aims to provide you with the right tools and knowledge to bolster the security of your applications. Through a hands-on, step-by-step approach, we will guide you to integrate authentication into a basic web application. Our philosophy hinges on the belief that learning is best facilitated through practical examples.
1. Keycloak
Before proceeding, it's essential to be familiar with Keycloak and have an instance in use. For those who are new to Keycloak, it's recommended to spend some time understanding its purpose and capabilities. In short, Keycloak is an open-source identity and access management platform. If you're confident in setting it up, you can quickly launch Keycloak as a standalone Docker container using the following command:
docker run -p 8080:8080 -e KEYCLOAK_ADMIN=admin -e KEYCLOAK_ADMIN_PASSWORD=admin quay.io/keycloak/keycloak:21.1.1 start-devAfter executing this command, you'll need to create a realm, add at least one user, and ensure Keycloak has connectivity to the Kubernetes (k8s) cluster where the application will be deployed.
In our setup, Keycloak runs in High Availability (HA) mode on a Google Kubernetes Engine (GKE) cluster, with Microsoft Azure Active Directory (AD) configured as the Identity Provider. To enable group-level mapping between Keycloak and Azure AD, we have configured it as oidc . This configuration allows users to authenticate apps/services using their Azure AD credentials via Keycloak. A detailed explanation of this setup will be left for a future blog post.
2. Gatekeeper
Gatekeeper is a straightforward authentication and authorization proxy, initially created by the Keycloak organization. As development has ceased, several projects have forked the source code and continued Gatekeeper's development. We use gogatekeeper in our implementation.
3. Implementation
Let's dive into the practical implementation - imagine you have an application that you wish to secure with authorization.
3.1. Create and Configure a Keycloak Client
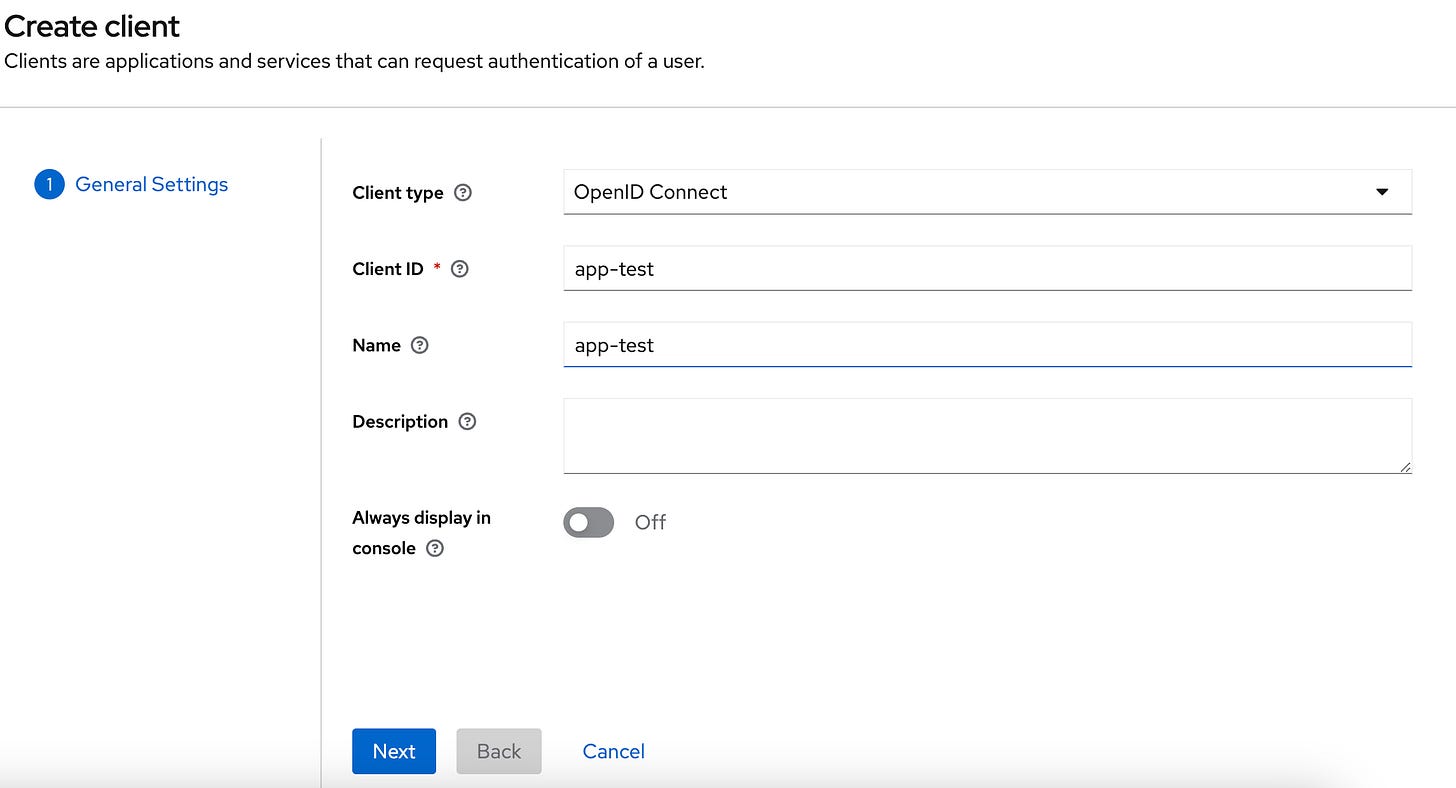
First, navigate to your Keycloak instance, choose the desired realm, and then head to the Clients section. Here, create a new client (as shown in Figures 3.1 and 3.2).
Upon completing these steps, your client should now be created.
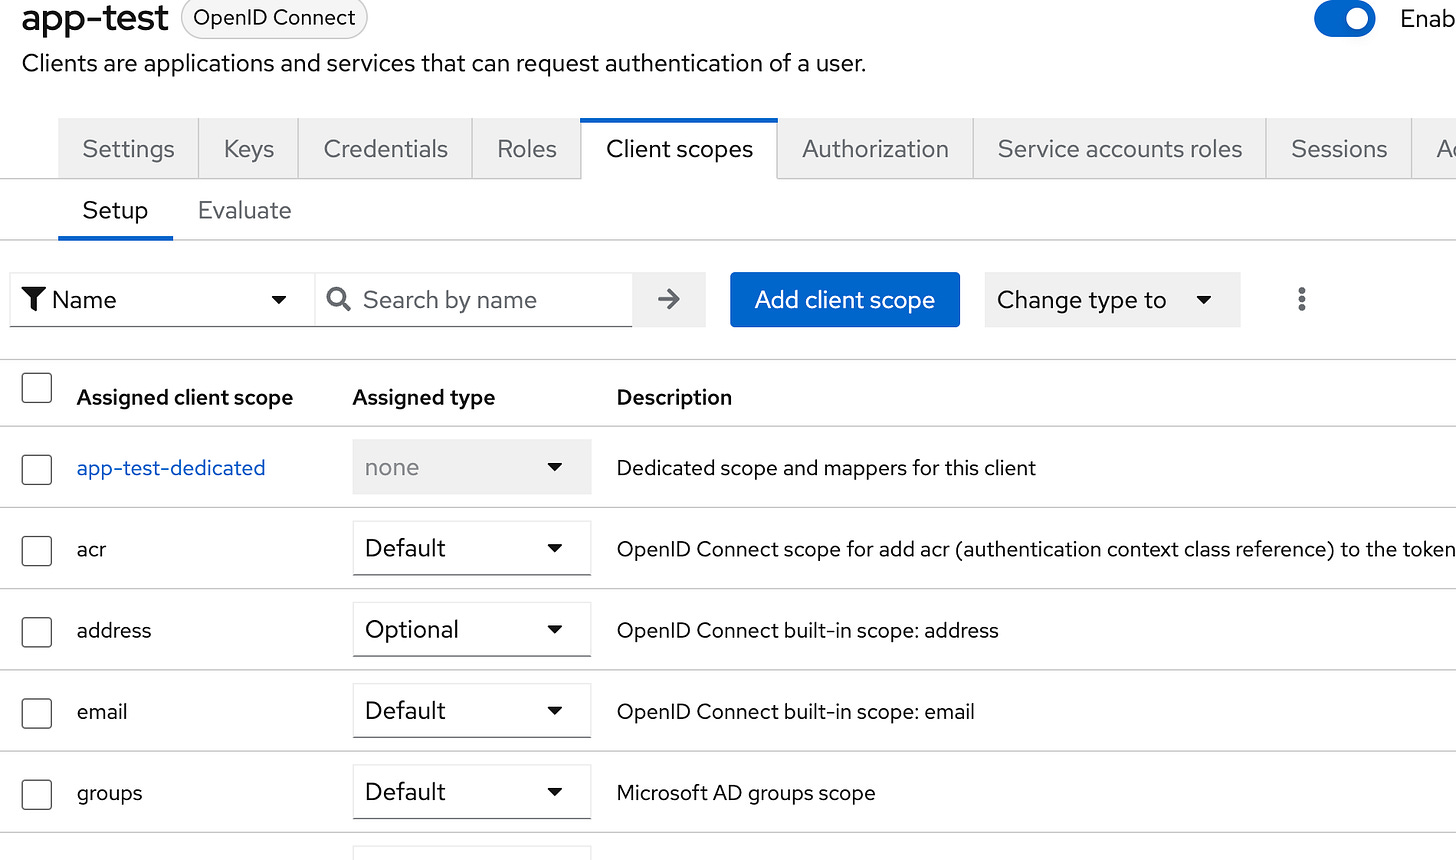
The next step involves creating Protocol Mappers for groups and audiences. Head to the Client Scopes section of your client, and click on the dedicated scope and mappers, as shown in Figure 3.3.
Next, navigate to the Mappers tab and click on Add mapper followed by By configuration. This will present you with options to select the ones you need. First, choose Group Membership as depicted in Figure 3.4.
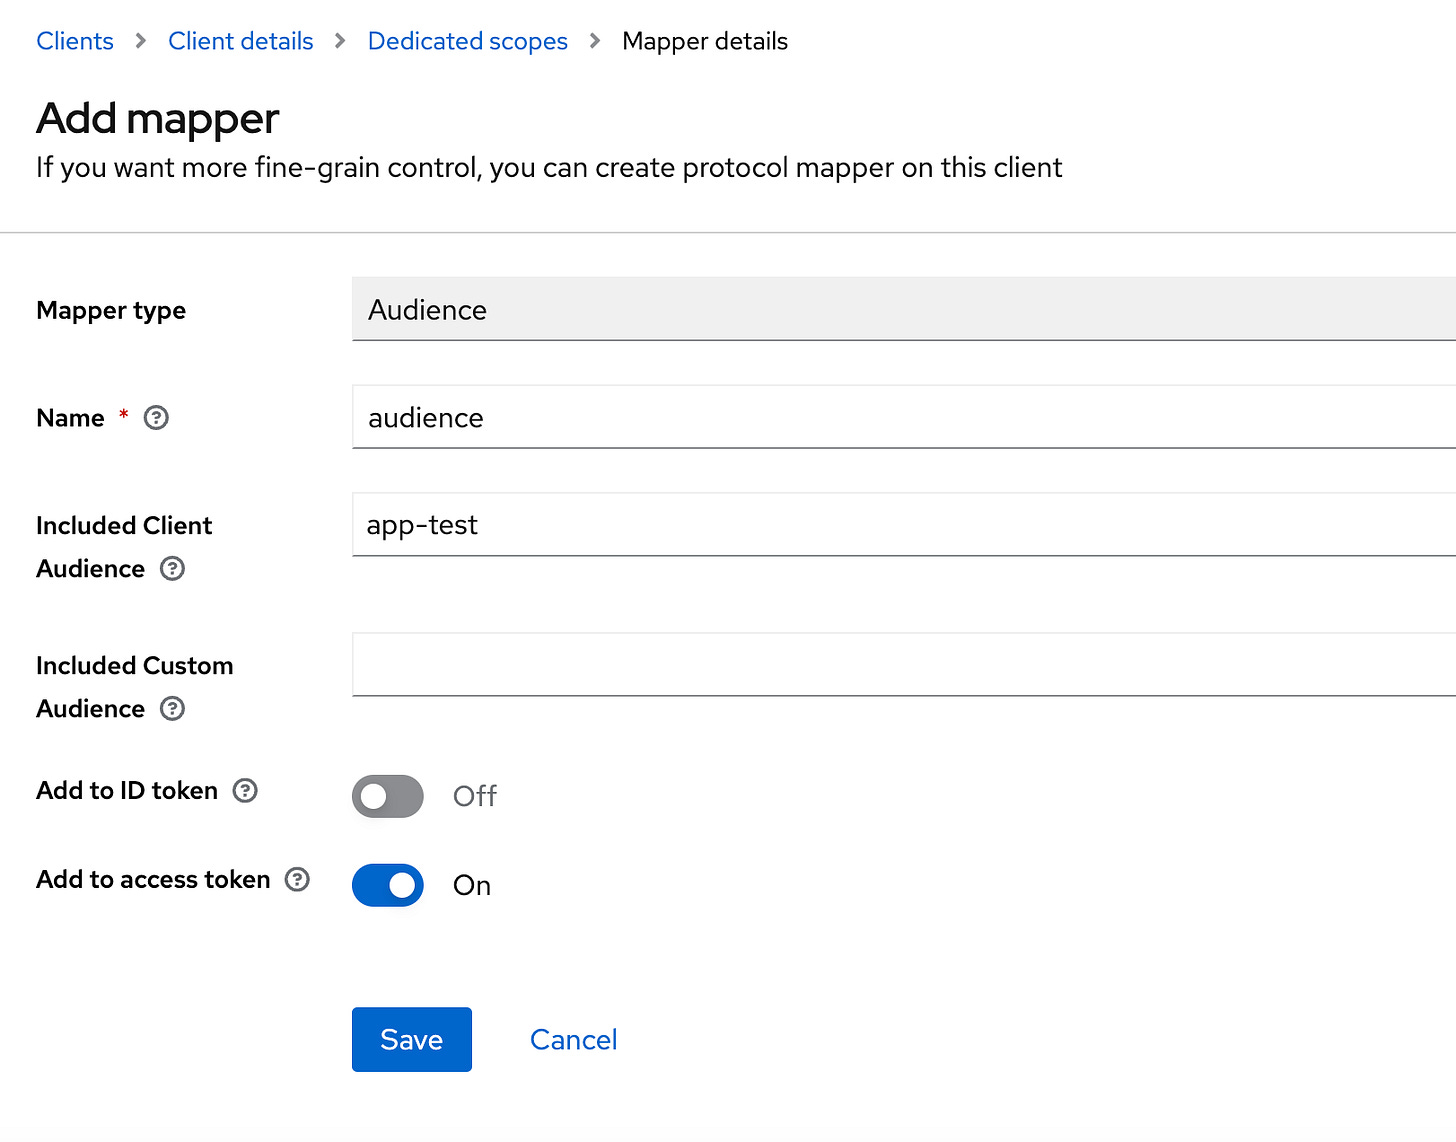
Repeat these steps and select Audience as displayed in Figure 3.5.
Lastly, ensure that you input the Redirect URI, which informs the Keycloak client which application is authorized to utilize this client. For the time being, you can configure it with http://* and/or https://*.
3.2. Groups and Users
This section caters to individual preferences and requirements. While not prescribing a specific approach, it is worth noting that from a usability standpoint, having a dedicated group(s) linked to your Keycloak client enables more granular access levels.
For testing, it is advisable to create a group and two users: one who is part of the group and another who is not. To create a group in Keycloak, simply go to Groups and click Create group. Next, head to Users and click Create user. Once you've filled in all the necessary details, click on Join groups to add the user to the group created earlier, as illustrated in Figure 3.6.
For the second test user, do not perform this final step of adding them to the group.
After the users are created, you can set up their passwords or request them to do so during their initial login. There are numerous other configuration options available, so feel free to explore them.
3.2.1. Mapping Keycloak Group to Identity Provider Group (Optional)
This optional step is included because many individuals use Keycloak in conjunction with an Identity Provider. This means that if we want user groups configured in the Identity Provider to access our application, the appropriate mapping must be established. In our case, we use Microsoft Azure AD and map the AD group ID value to the desired group in Keycloak. To do this, go to Identity providers, select the desired provider, navigate to the Mappers tab, and create a new mapping as demonstrated in Figure 3.7.
4. Simple Web App
I have created a basic k8s application consisting of Deployment and Service resources. It's important to note that I am not using ingress, so SSL/TLS is not enabled. Since I am deploying on GKE, I am using the annotation networking.gke.io/load-balancer-type: "Internal" to obtain an internal IP. However, you may not need this for your environment.
To give you an idea of how Gatekeeper functions, we will first deploy the application without Gatekeeper and Keycloak. The figure below illustrates the app's deployment scheme without Gatekeeper in the scenario.
You can use the following YAML manifest to create Deployment and the Service:
---
apiVersion: apps/v1
kind: Deployment
metadata:
  labels:
    app: api-test
  name: api-test
spec:
  replicas: 1
  selector:
    matchLabels:
      app: api-test
  template:
    metadata:
      labels:
        app: api-test
    spec:
      containers:
        - name: api-test
          image: yeasy/simple-web:latest
          imagePullPolicy: IfNotPresent
          resources:
            requests:
              memory: "384Mi"
              cpu: "375m"
          ports:
            - containerPort: 80
---
apiVersion: v1
kind: Service
metadata:
  name: api-test
  annotations:
    networking.gke.io/load-balancer-type: "Internal"
  labels:
    app: api-test
spec:
  type: LoadBalancer
  ports:
  - port: 80
    targetPort: 80
    protocol: TCP
  selector:
    app: api-test
If you prefer, you can remove the Service and instead utilize port forwarding. To apply the manifests, execute:
kubectl apply -f api-test.yaml
kubectl get pods --all-namespaces
After applying the template above, you should see the Service, Deployment,
and Pod deployed. To access the simple web app via a browser, use the Service IP.
You should see a view similar to the one displayed in Figure 4.2.
Congratulations! The simple application is now up and running.
5. Protect the Application with the gatekeeper
As we've previously learned, Gatekeeper is used as an authentication proxy. In comparison to the setup in the previous section, the new configuration should resemble the one depicted in Figure 5.1.
In the image above, you can see how the Service resource communicates with the Gatekeeper container, rather than directly with the application. The gatekeeper initiates authentication and authorization against Keycloak, either granting or denying access to the application. This means that the Gatekeeper configuration contains redirection details and authentication details.
The Gatekeeper configuration file is created within a ConfigMap, allowing it to be mounted as a volume in the pod container:
apiVersion: v1
kind: ConfigMap
metadata:
  name: gatekeeper-config
data:
  keycloak-gatekeeper.conf: |+
    discovery-url: https://<yourkeycloakFQDN>/realms/<your-realm>
    enable-default-deny: false
    secure-cookie: false
    client-id: app-test
    client-secret: fi9cU5n5ytu2L0LF2J9u8FJNL5cNEHet
    listen: :3000
    encryption-key: AgXa7xRcoClDEU0ZDSH4X0XhL5Qy2Z2j
    redirection-url: http://10.164.0.42
    upstream-url: http://127.0.0.1:80
    resources:
    - uri: /*
      groups:
      - app-test-group
    - uri: /public/*
      white-listed: true
    - uri: /favicon
      white-listed: true
    - uri: /css/*
      white-listed: true
    - uri: /img/*
      white-listed: true
Important parts of the config are:
discovery-url- Keycloak server realm address and path.client-id- The client ID we used when creating the client.client-secret- Obtained from the Credentials tab in the Keycloak app-test client we created. Shown in Figure 5.2.redirection-url- URL used by the application. In this case, the IP of the `Service`. This is an optional parameter since it defaults to the URL scheme and host, but it is important to mention when HTTPS is used, as you often want to specify where authentication should be directed.upstream-url- URL where Gatekeeper will forward traffic. It is `127.0.0.1` since containers inside the same pod communicate via the local network, and port 80 since our test app uses port 80.secure-cookie- In this case, set to false since we're using HTTP, not HTTPS.enable-default-deny- Indicates if we should deny all incoming requests by default and explicitly state what is allowed.resources- Collection of resources we want to protect/expose and the groups that can access them.
For more details about the config itself, you can check the GoGatekeeper Keycloak config.
To accommodate the changes, we need to update the deployment templates. The new YAML file should look like this:
---
apiVersion: apps/v1
kind: Deployment
metadata:
  labels:
    app: api-test
  name: api-test
spec:
  replicas: 1
  selector:
    matchLabels:
      app: api-test
  template:
    metadata:
      labels:
        app: api-test
    spec:
      imagePullSecrets:
        - name: gitlab-registry
      containers:
        - name: api-test
          image: yeasy/simple-web:latest
          imagePullPolicy: IfNotPresent
          resources:
            requests:
              memory: "384Mi"
              cpu: "375m"
        - name: gatekeeper
          image: quay.io/gogatekeeper/gatekeeper:2.3.1
          resources:
            requests:
              memory: "128Mi"
              cpu: "125m"
          args:
            - --config=/etc/keycloak-gatekeeper.conf
          ports:
            - containerPort: 3000
          volumeMounts:
            - name: gatekeeper-config
              mountPath: /etc/keycloak-gatekeeper.conf
              subPath: keycloak-gatekeeper.conf
      volumes:
        - name: gatekeeper-config
          configMap:
            name: gatekeeper-config
---
apiVersion: v1
kind: Service
metadata:
  name: api-test
  annotations:
    networking.gke.io/load-balancer-type: "Internal"
  labels:
    app: api-test
spec:
  type: LoadBalancer
  ports:
  - port: 80
    targetPort: 3000
    protocol: TCP
  selector:
    app: api-test
In this manifest, notice that the application itself has no ports exposed. The only port exposed is the Gatekeeper port. When you deploy the updated application with the Gatekeeper configuration, you should see two containers in the pod, as shown in Figure 5.3 and Figure 5.4.
If you prefer to use a stricter redirect URI, you can replace http://* with http://10.164.0.42/oauth/callback. Note that in this case, the IP used is the test application's Service IP. Typically, you should use HTTPS and a fully qualified domain name instead of the IP.
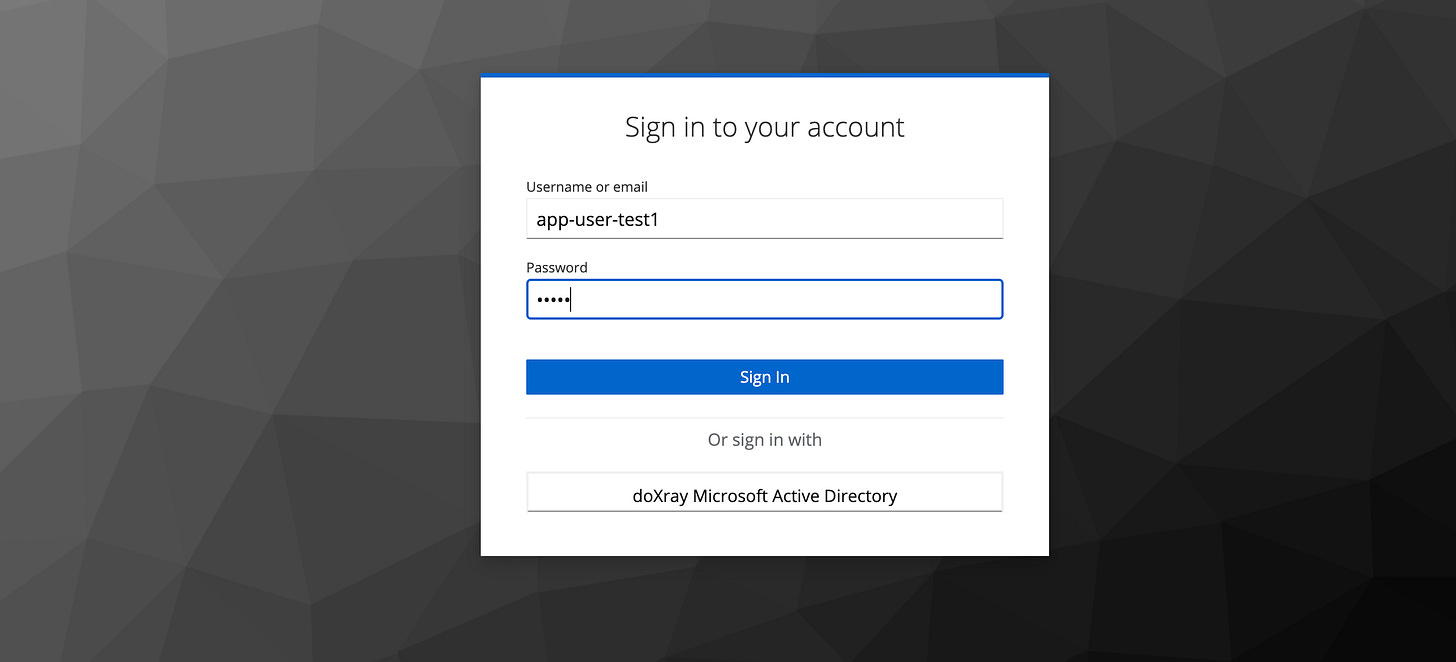
Now, when attempting to access the app, you will be redirected to the Keycloak authentication window before accessing the app, as shown in the figure below.
After logging in, you will notice that the request originated from localhost (Figure 5.6). In this case, it means that the Gatekeeper container inside the pod we deployed has contacted the application within the same pod via the local network.
Upon checking the Gatekeeper logs, you can see that it first verifies if there is an existing session token. If not, it initiates a new session if the user is authenticated properly:
2023-06-05T14:00:15.858Z    error    no session found in request, redirecting for authorization    {"error": "authentication session not found"}
2023-06-05T14:00:22.261Z    info    issuing access token for user    {"email": "test@doxray.com", "sub": "17c13f75-6c86-4aee-8d66-ce1775548967", "expires": "2023-06-05T14:15:22Z", "duration": "14m5
If we attempt to log in with another user who does not belong to the group we created and assigned in Keycloak and Gatekeeper configurations, access will be denied, as illustrated in Figure 5.7.
Upon examining the Gatekeeper logs, it becomes evident that the user is not a member of the necessary group:
2023-06-05T14:02:46.267Z    error    no session found in request, redirecting for authorization    {"error": "authentication session not found"}
2023-06-05T14:02:52.051Z    info    issuing access token for user    {"email": "test2@doxray.com", "sub": "2317d31e-adfb-4bed-8ab0-e53a2ececa0d", "expires": "2023-06-05T14:17:52Z", "duration": "14m
2023-06-05T14:02:52.093Z    warn    access denied, invalid groups    {"access": "denied", "email": "test2@doxray.com", "resource": "/*", "groups": "app-test-group"}
It is good to note that Gatekeeper allows the addition of custom forbidden pages, which may be necessary for specific use cases.
Furthermore, you can employ an Identity Provider for authentication with your application (refer to section 2.1). Observe the availability of an additional login option for Microsoft Azure AD, as seen in Figure 5.5. This feature may have already caught your attention.
6. Conclusion
Gatekeeper serves as an effective authentication proxy solution that, in appropriate use cases, can significantly reduce development time. With its customizable and configurable nature, Gatekeeper becomes easier to use as you familiarize yourself with it. As mentioned earlier, integrating Gatekeeper requires minimal changes to application authentication. You only need an additional `configMap` containing the Keycloak configuration and a `Deployment` to set up the sidecar container responsible for handling authentication.
I hope you find this information valuable and applicable to your projects.


